How to prepare the project for color grading. – Updated
AuthorAlphabet Films OÜ
Published
2022-07-26
So you have finally finished the project and are ready to hand it off to a colorist for color grading.
But now what? Should you just export it to a prores file or are there any other options as well?
That’s what we’re going to find out. This guide covers AdobePremiere Pro, Final Cut Pro, and DaVinci Resolve.
Table of Contents
Add a header to begin generating the table of contents
Common guidelines:
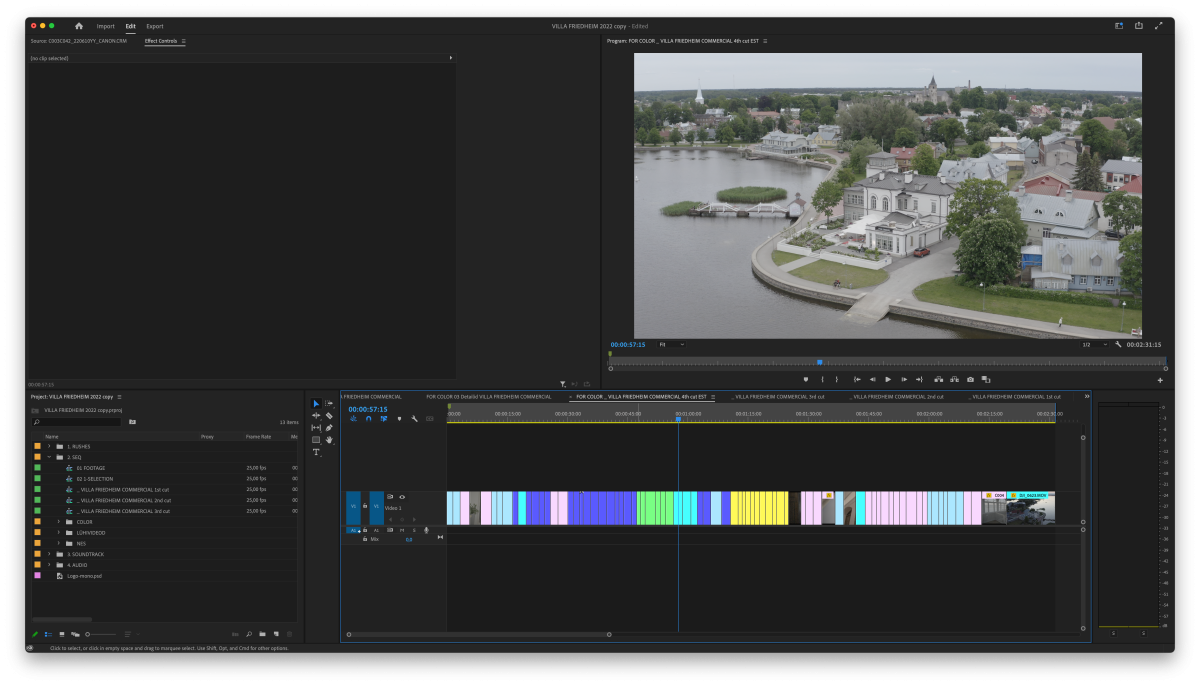
The rule of thumb is to always simplify your project before handing it over. What does it mean?
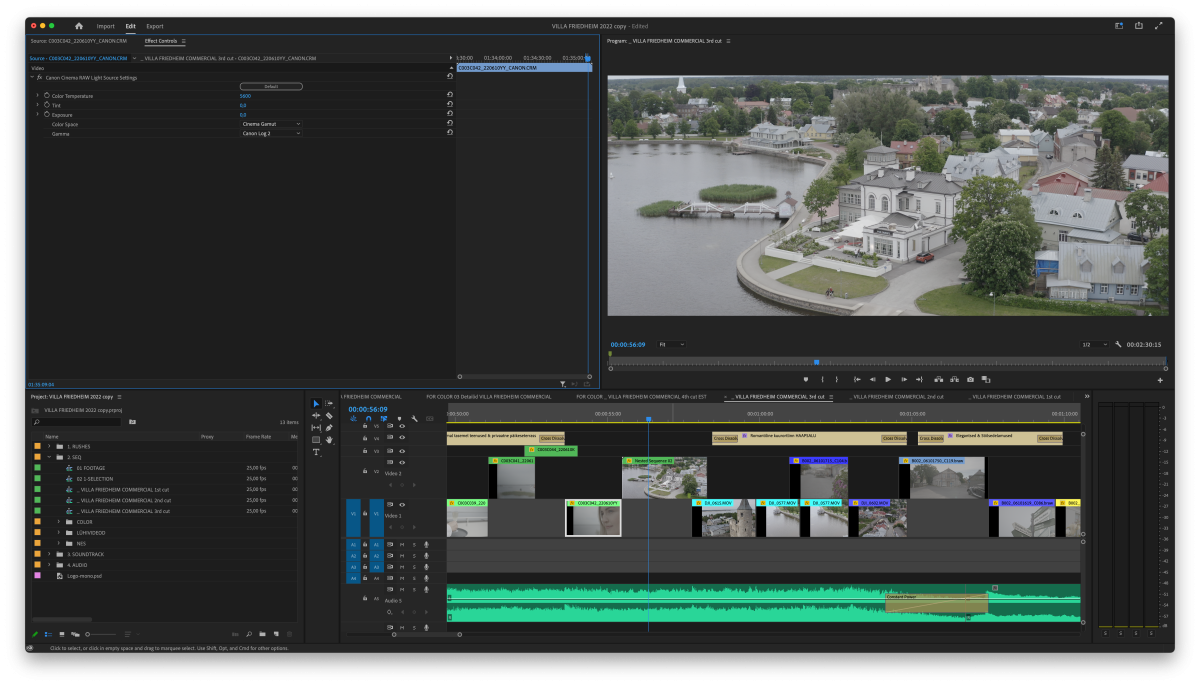
Here is a timeline that you usually expect to see when the edit is ready to ship.
This is a simplified version. Footage is ungraded, without transitions, effects, or titles. No graphics to avoid interference with grading. Focus is solely on grading the clips. All the footage is on one track.
Convert H265/H264 footage first
Having footages in these containers is known to create issues in the grade afterwards. Such as:
1. Timecode shifts.
2. Stuttering playback.
3. Variable frame rate issues.
It is advised to convert all such media to ProRes/DNxHR or other such All-I frame format to mitigate the problems. Just have to be certain to not lower the clip bit-debth.
Bonus:
1. Delete unused files, remove color effects and unwanted plugins from clips.”
2. Export reference file for colorist to compare the XML for accurate conform.
1080p H264/H265 file with decent bitrate is acceptable, no need for 4K prores 😉
1. Adobe Premiere Pro
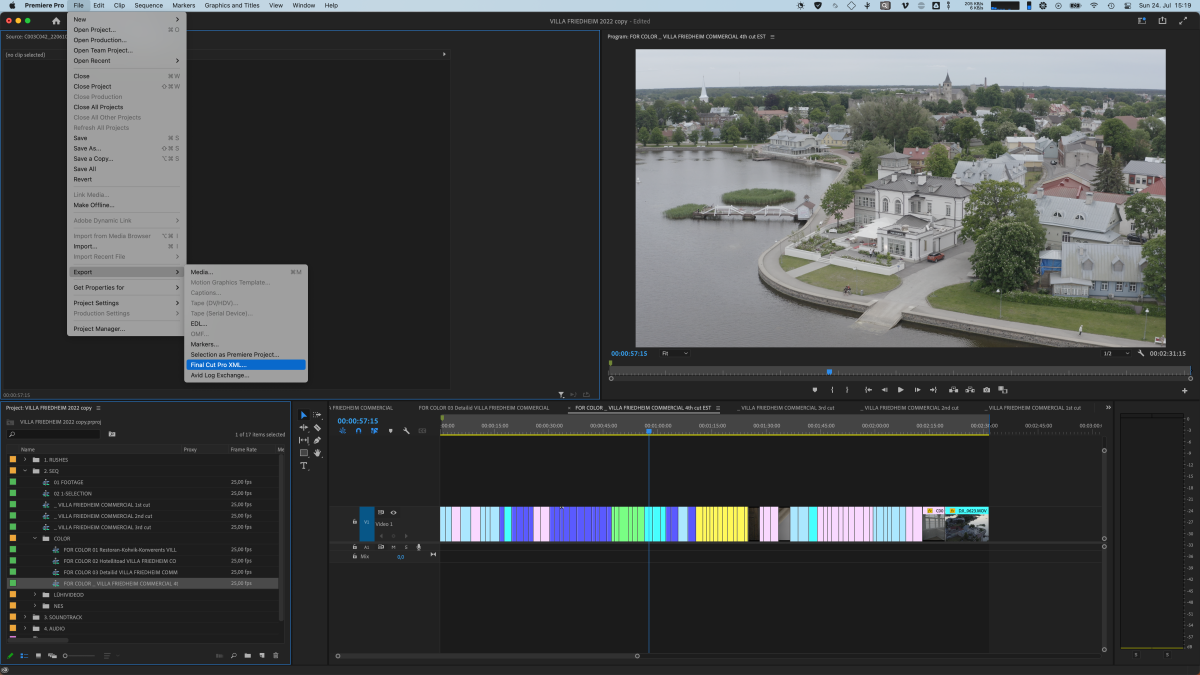
Now that your timeline is cleaned and ready to be handed over we can start with preparing the XML file. Select your timeline and head to File>Export>Final Cut Pro XML. Now just select an appropriate location and you should be good to go. Look out for any errors if there are any as well. It’s a .txt file next to your .xml
1. XML Export.
Head to File > Export > Final Cut Pro XML…
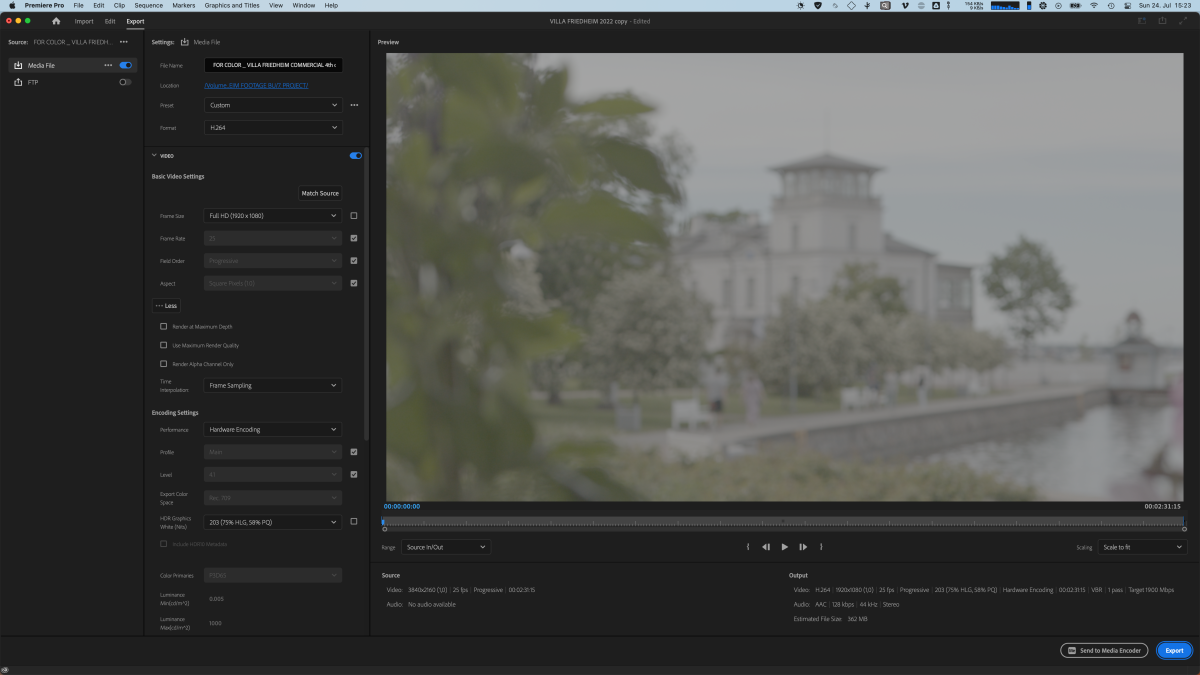
2. ProRes file export.
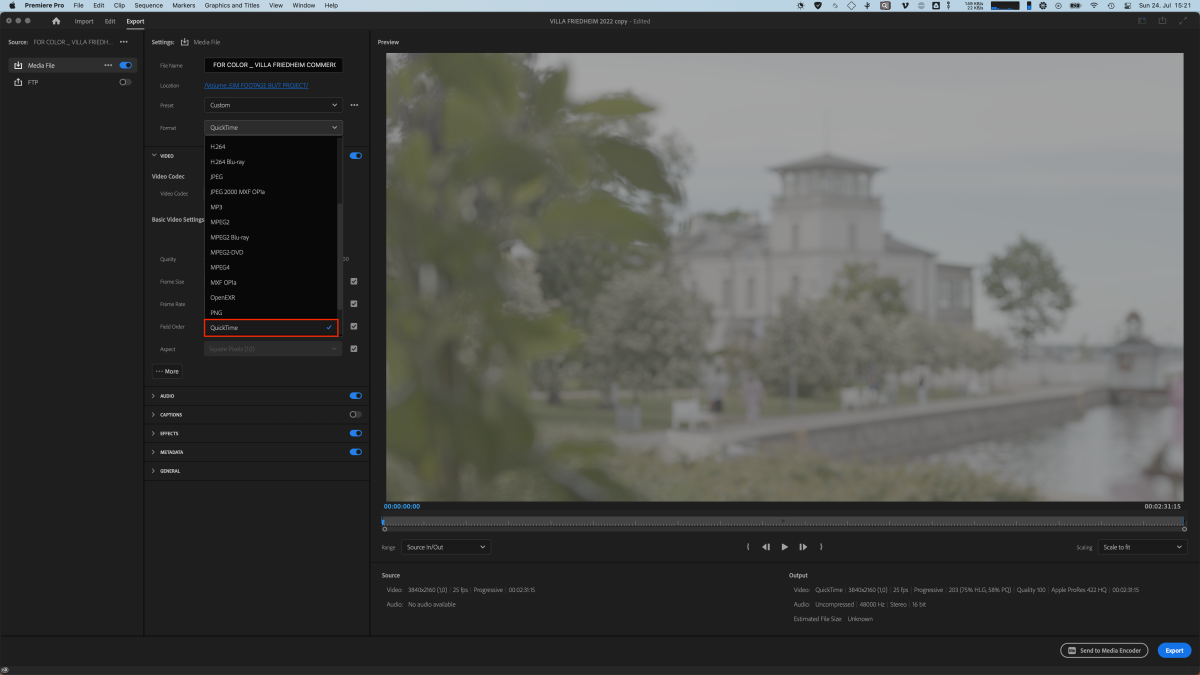
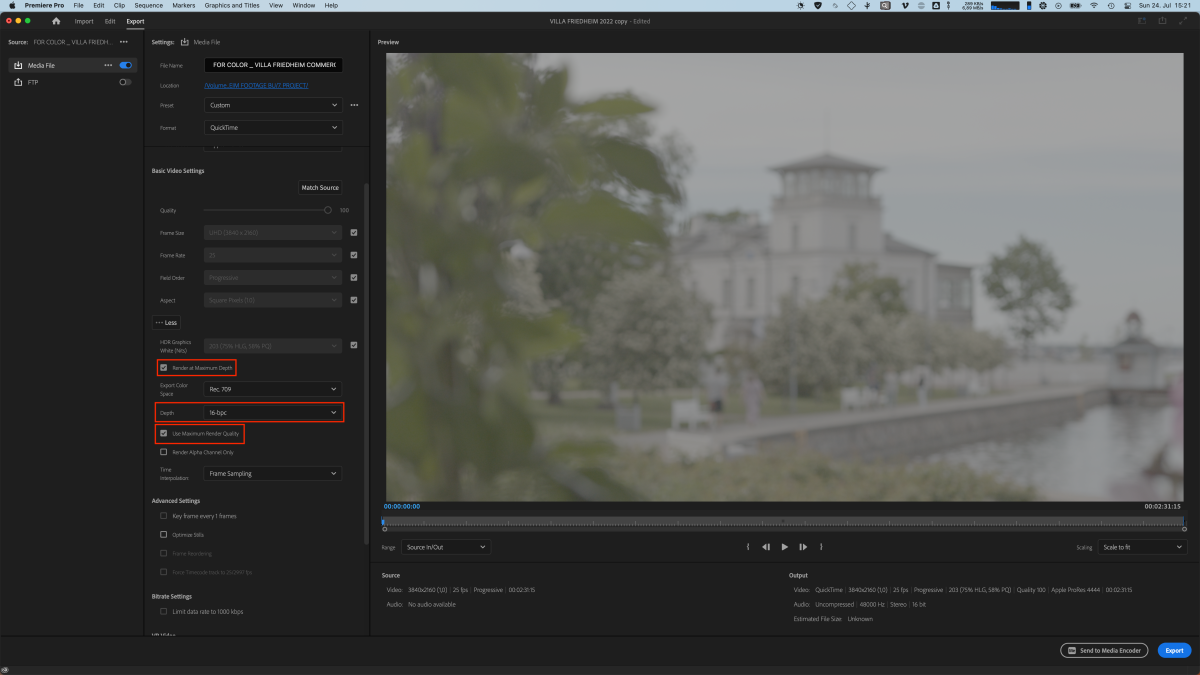
If you don’t have the option to ship the drive then ProRes 4444 usually works as well. All the same, rules apply here as well. No transitions, text, graphics, or effects are applied to the footage. Also, don’t forget to disable any lumetri color adjustments you may have. I have received a few fake ProRes files from Premiere Pro in the past so keep in mind to tick a few boxes.
Select QuickTime preset.
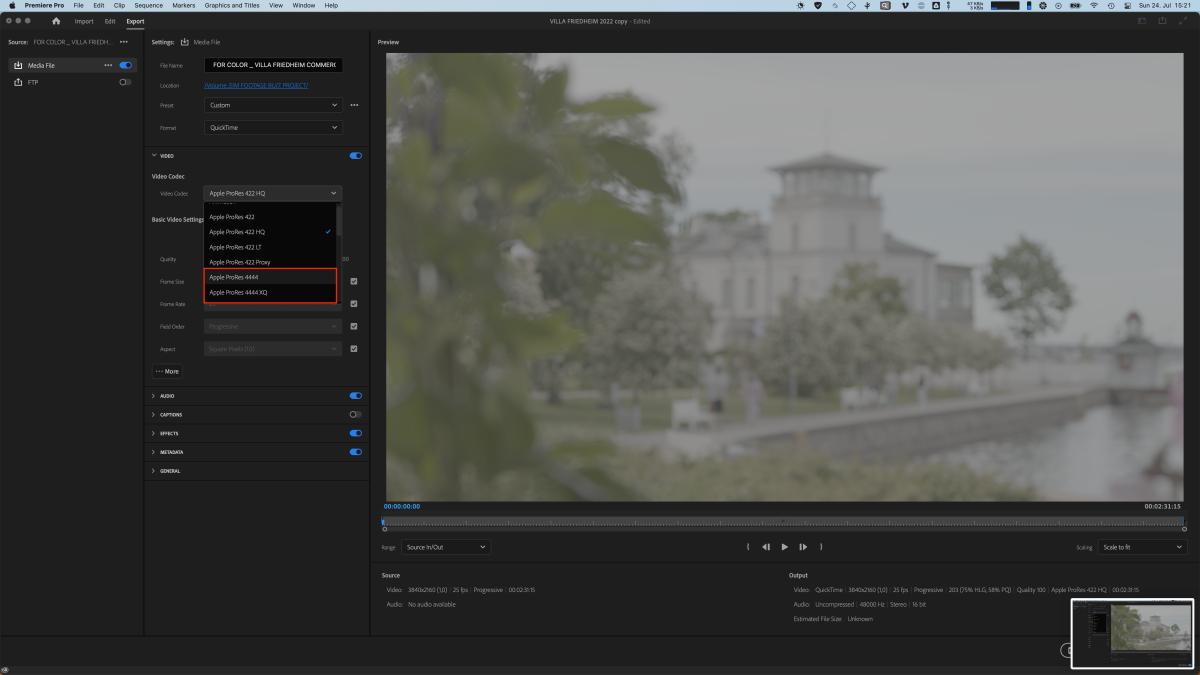
Make sure it’s Apple ProRes 4444 or (4444 XQ for HDR delivery)
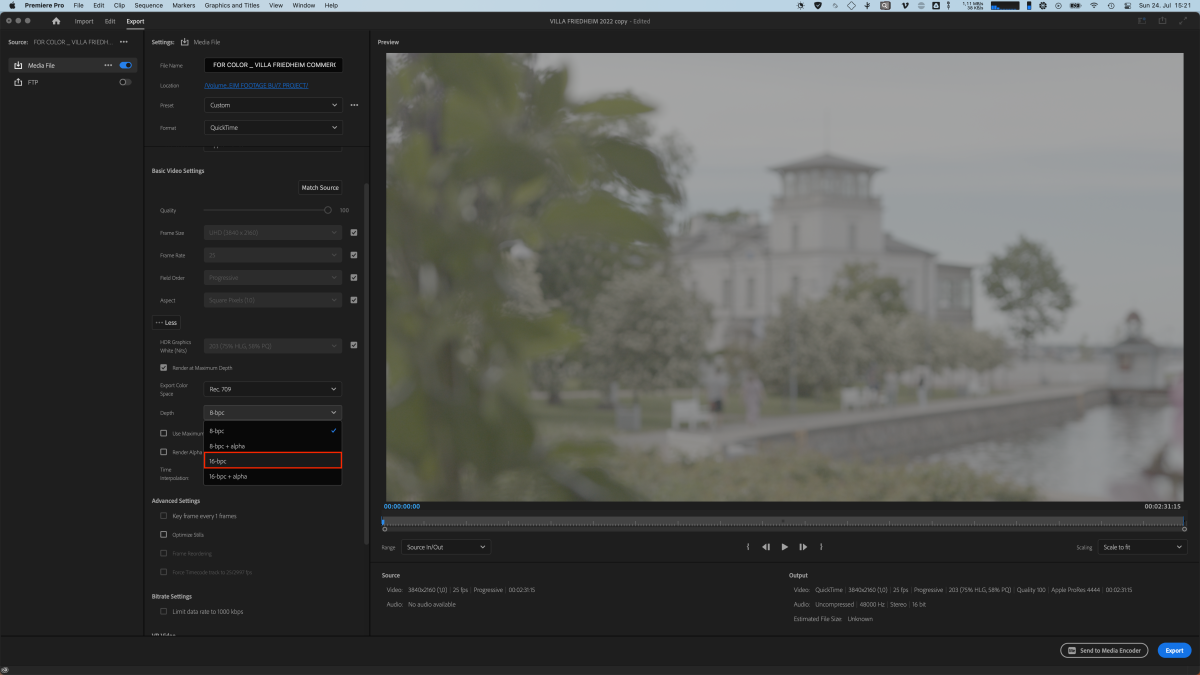
Select 16-bpc to make your colorist happy. Otherwise, we are gonna ask you to enable it anyways. It’s a fault of adobe for letting you even export a “fake” 12-bit prores file. If 16-bpc is not enabled then the colorist is going to run into significant banding issues down the line.
Last but not least make sure you have ticked these boxes to export the real ProRes in all its glory. *Adobe pls fix!*
And now you’re ready to hit that export button!
Click here to download the (real) Apple ProRes 4444 preset.
2. Final Cut Pro
If you are the editor in Final Cut Pro then it’s a bit more of a simple process to handle. As the ProRes files out of Final Cut are the real deal by default.
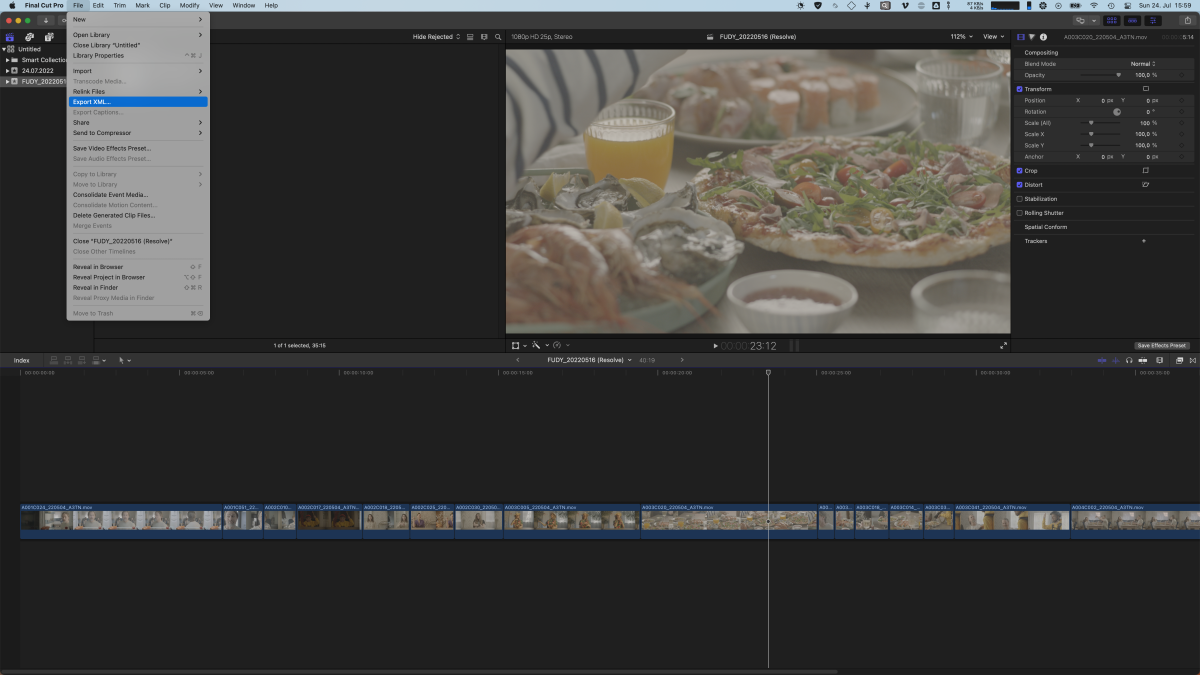
1. XML EXPORT
Head to File>Export XML…
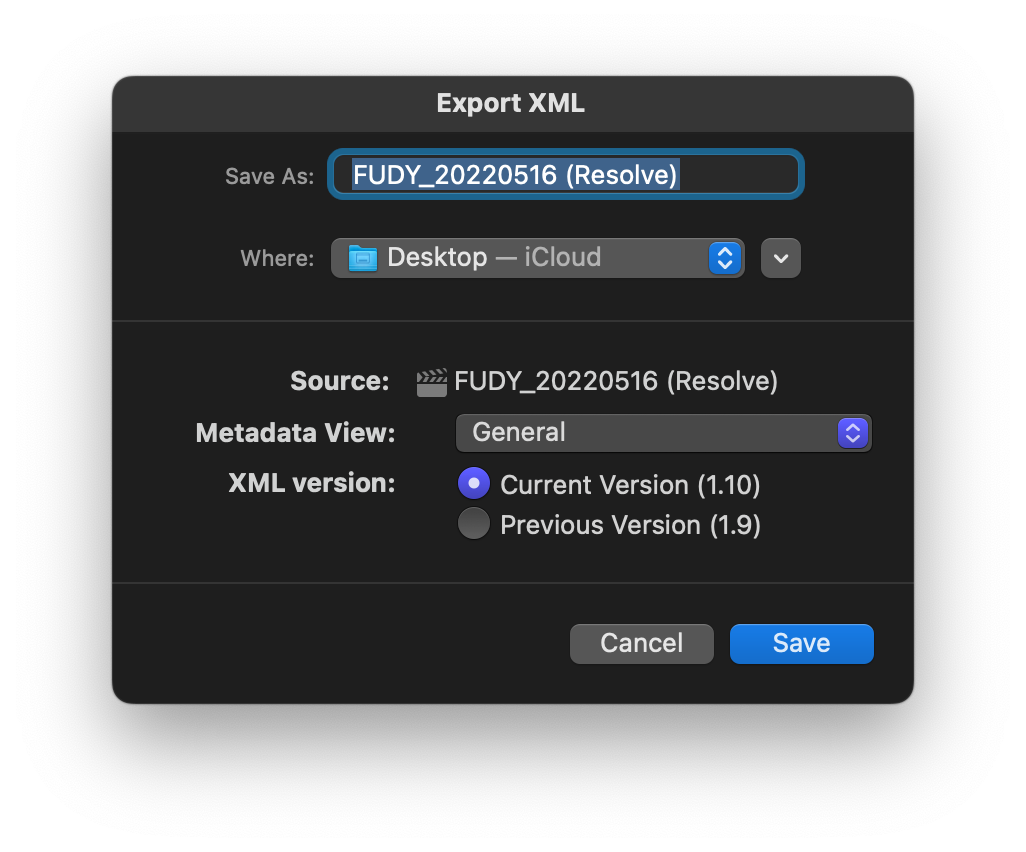
Now a window pops up. You can probably leave it as default. Select your location and done!
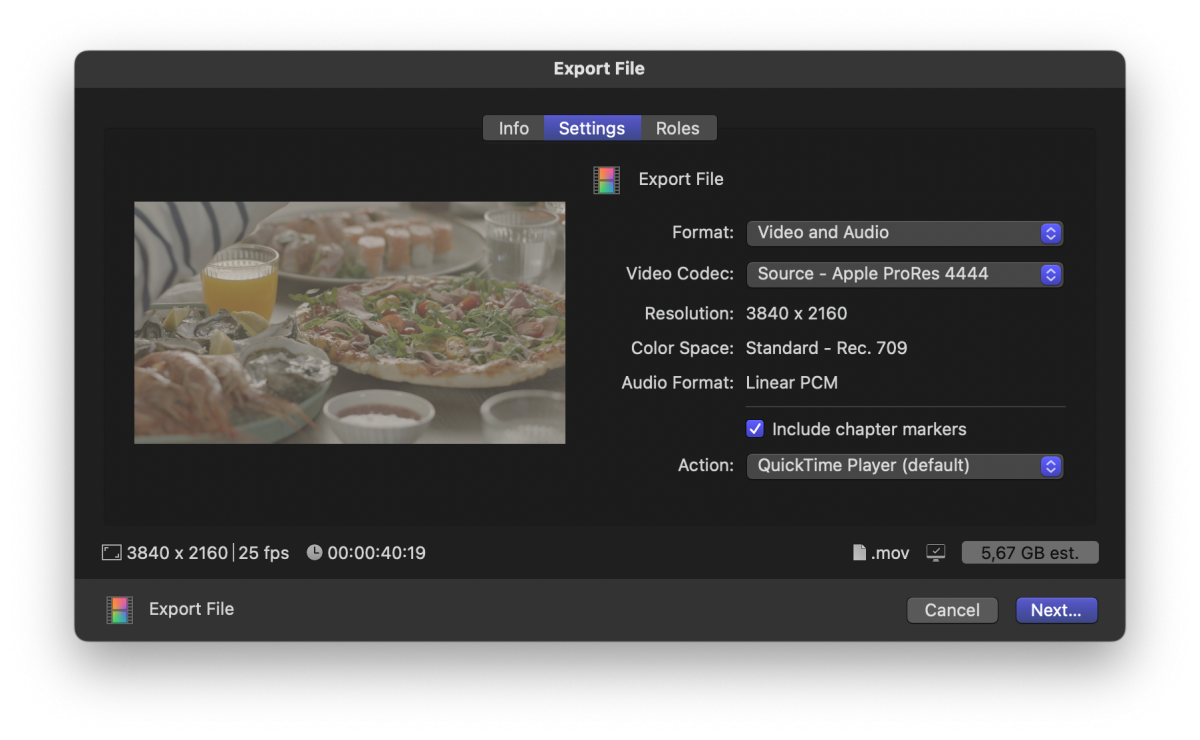
2. Exporting a ProRes.
Go to Export>Settings and select Apple ProRes 4444 or (4444 XQ for HDR delivery)
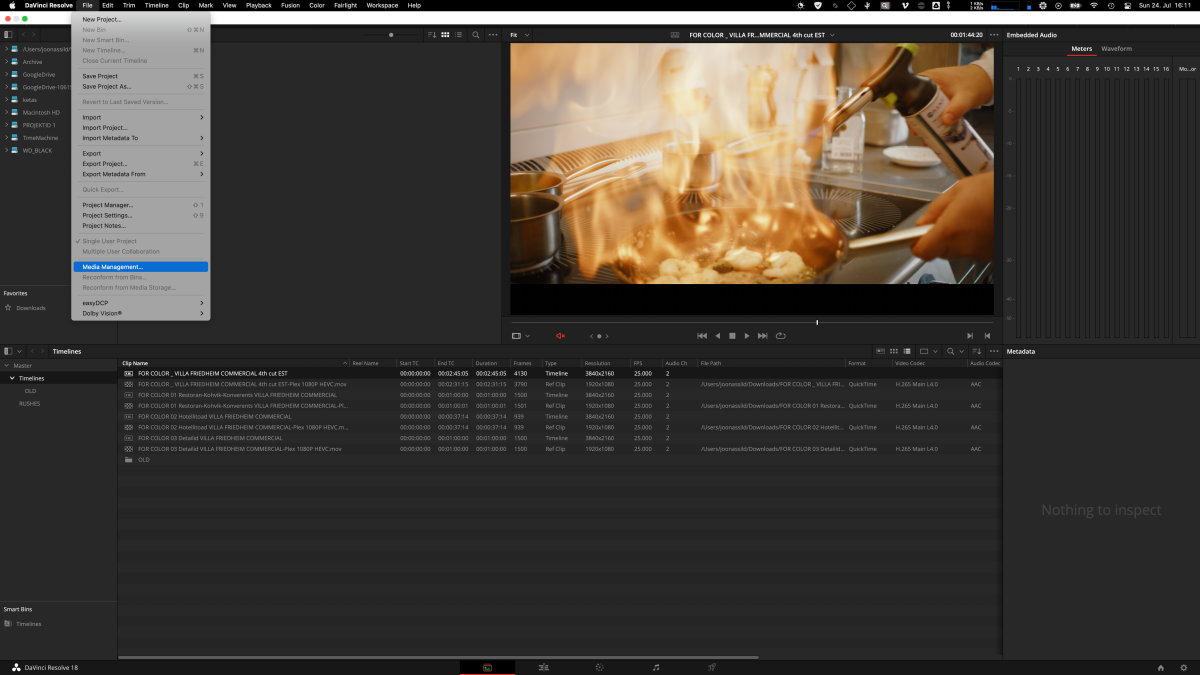
3. DaVinci Resolve
This one is my favorite as a colorist who is working with DaVinci as well. That’s because from here we have 4 different methods of exporting a delivery.
1. Automatically cutting source files with all the data unchanged using Media Management.
It’s the fastest and simplest file delivery method so far and it preserves all the original raw data. As of now, I have never experienced any significant issues when files are delivered using this method.
Go to File>Media Managment…
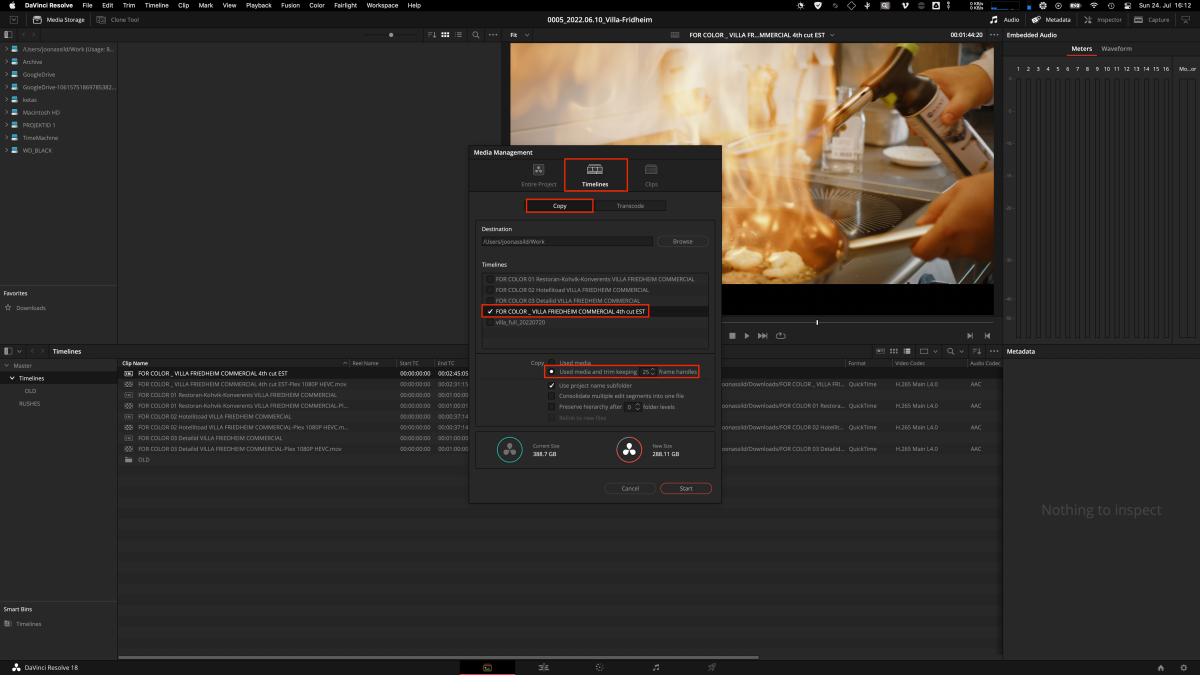
Next click on Timelines, select your timeline and click on the Copy tab. This copies only the necessary data used in the project. Also, click on used media and use trim with 1 second of the buffer. (25 frames for 25fps video.)
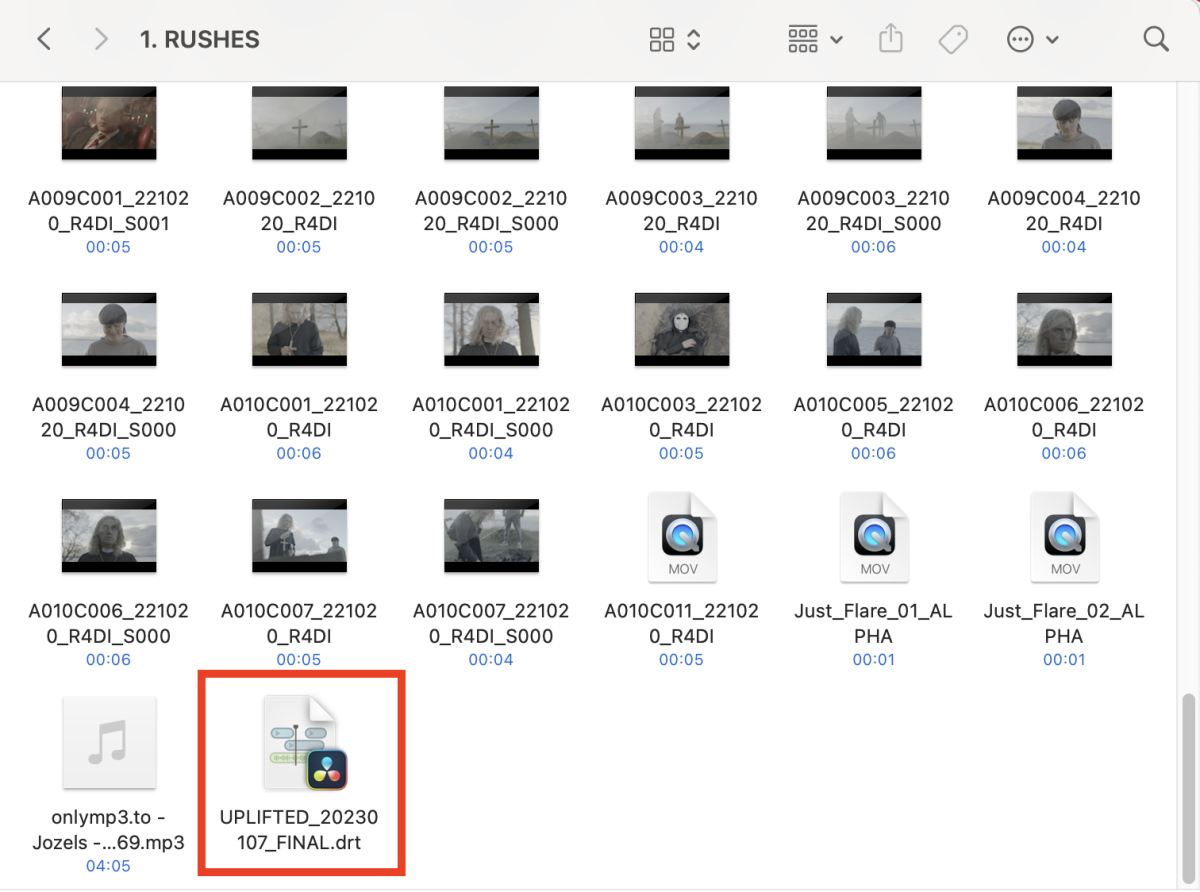
Take note of the .drt file that is included in the folder you exported the files to. It's important to include it as well. It has all the media already linked and saves time down the line.
I know that Adobe Premiere Pro has a similar function however I have yet to get it to constantly work so I’m not gonna include it in the guide.
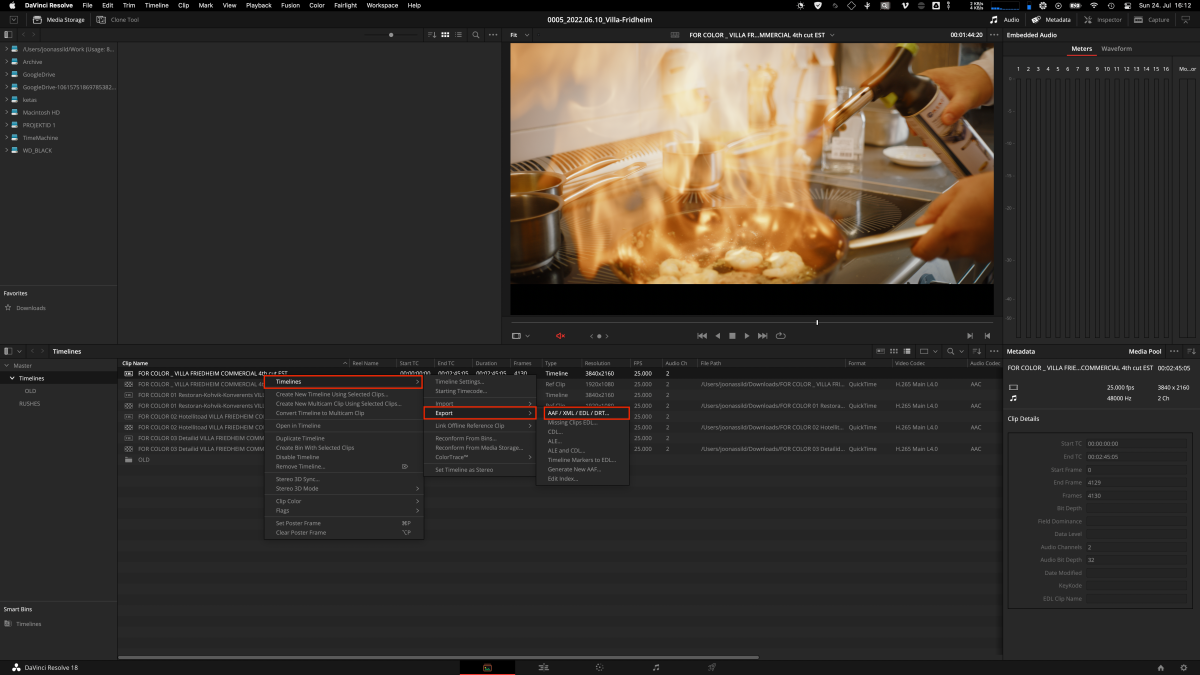
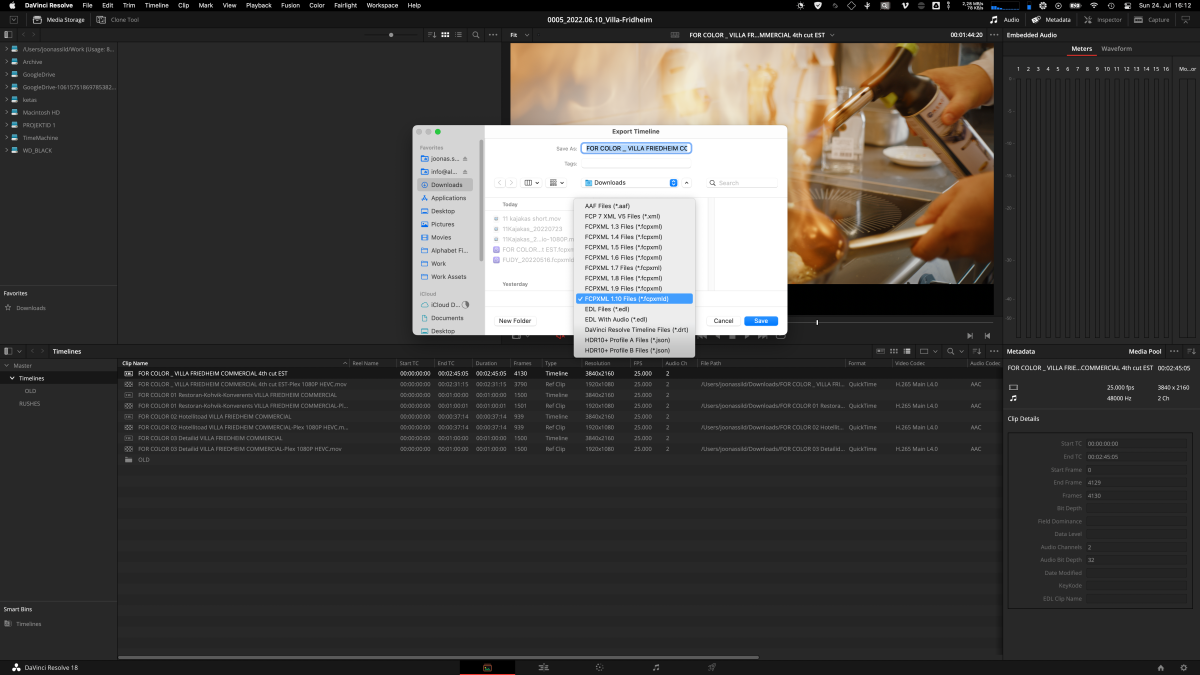
2. Exporting an XML / DRT
Select your timeline, right click and follow the menu Timelines>Export>AAF / XML / EDT
Now change the XML format to the latest one available (FCPXML 1.10 will do for now) If your colorist is using DaVinci Resolve use DaVinci Resolve Timeline Files.drt instead.
3. ProRes export method 1/2.
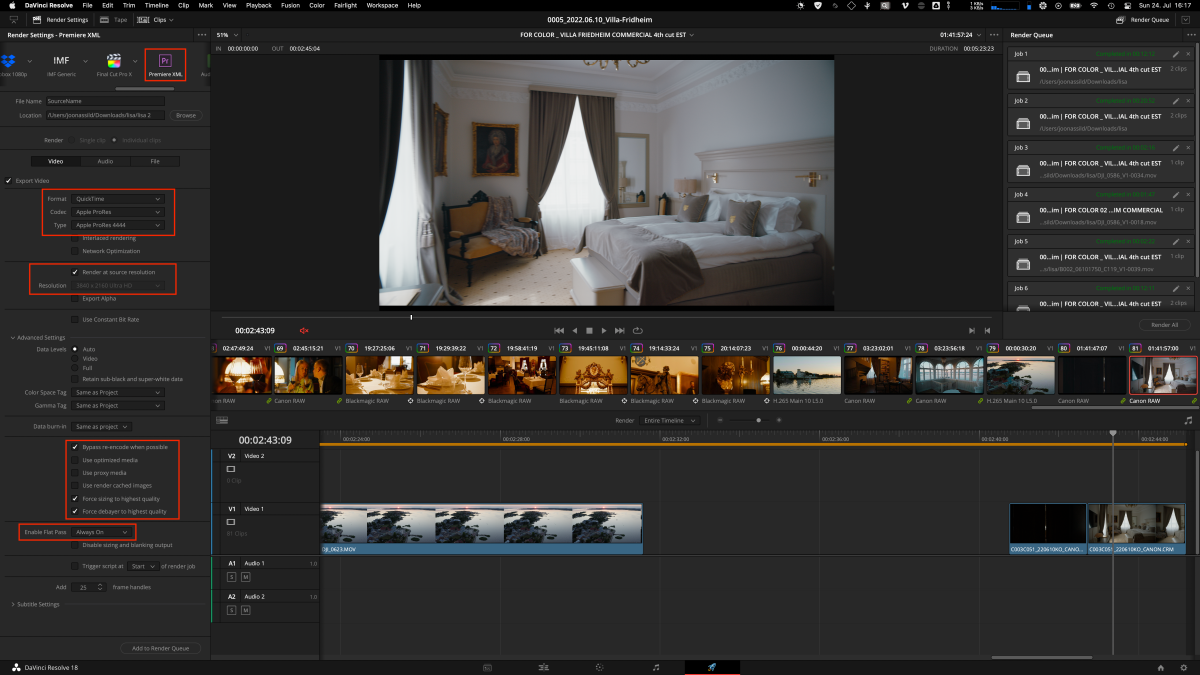
This is useful for colorists as every clip is already cut and ready to be imported into color grading software via automatically generated XML file alongside proper prores files. Take note of the Render (Individual Clips has been turned on)
Click on Premiere XML. Select ProRes 4444, render at source resolution (or 2160p) Next make sure to tick Bypass re-encode, Force sizing, Force debayer, and Enable Flat Pass so that any color adjustments you did will be disabled by default.
In File tab, select 'Use unique filenames' with suffix and 3-4 digits (999/9999) to prevent overwriting clips with the same name.
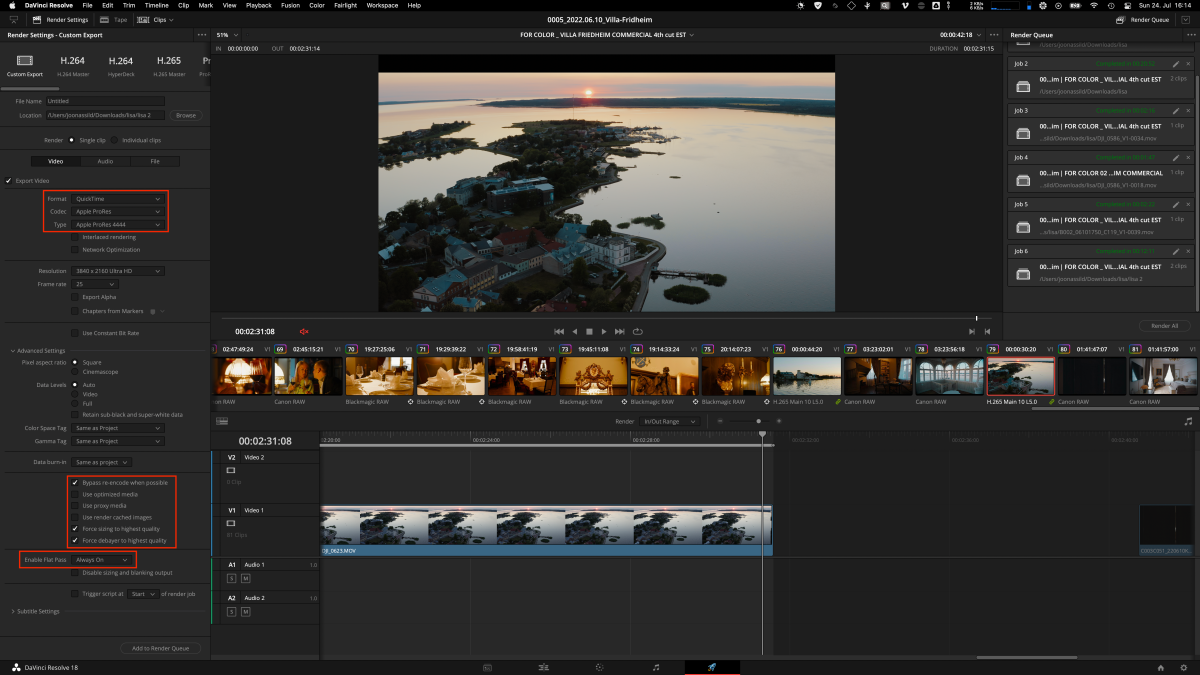
4. ProRes export method 2/2 aka the regular single prores export.
Head onto the export page. Select ProRes master preset and change it to ProRes 4444 or (4444 XQ for HDR delivery).
Now let’s change some additional settings as well. Bypass re-encode. Force sizing to the highest quality, Force debayer to the highest quality, and Enable Flat Pass to Always On. That’s it. Add to Render Queue and export that beast.
Thank you for reading the guide! I hope you gained some new knowledge by reading it! Feel free to let me know if you have any questions and keep in mind it’s always a good practice to check the workflow with your colorist as well! 🤘🏻